# Auto Scaling

Amazon EC2 Auto Scaling helps you ensure that you have the correct number of Amazon EC2 instances available to handle the load for your application.

**AWS Auto-Scaling** is a mechanism that automatically permits you to increase or decrease your resources to meet demand based on custom-defined metrics and thresholds.&#x20;

Through Auto-scaling, it’s simple to set up application scaling for multiple resources across multiple services in minutes.

<figure><img src="https://921544542-files.gitbook.io/~/files/v0/b/gitbook-x-prod.appspot.com/o/spaces%2FiRQTWHUNVZ5tIxQJXclF%2Fuploads%2FOmb0LaB5aH8Ov1OVocHX%2FAmazon-EC2-Auto-Scaling.jpg?alt=media&#x26;token=1b15117a-ba85-4ff5-ae43-832459c9d3f9" alt=""><figcaption><p>Auto Scaling</p></figcaption></figure>

Benefits

* **Setup Scaling Quickly**
* **Make Smart Scaling Decisions**
* **Automatically Maintain Performance**
* **Pay Only For What You Need**

<figure><img src="https://921544542-files.gitbook.io/~/files/v0/b/gitbook-x-prod.appspot.com/o/spaces%2FiRQTWHUNVZ5tIxQJXclF%2Fuploads%2FTDWqbR8o9LB8PaVQtVdp%2Fbenefits-1024x441.png?alt=media&#x26;token=c2a65268-d4f8-4d40-a701-a89e06f156f5" alt=""><figcaption><p>Benefits</p></figcaption></figure>

Auto-Scaling Workflow

AWS autoscaling will scale the application based on the load of application. Instead of scaling manually AWS auto scaling will scale the application automatically when the incoming traffic is high it will scale up the application and when the traffic is low it will scale down the application.

<figure><img src="https://921544542-files.gitbook.io/~/files/v0/b/gitbook-x-prod.appspot.com/o/spaces%2FiRQTWHUNVZ5tIxQJXclF%2Fuploads%2Fed1P8Ij2khL8rClVUaWJ%2F63b81bb8288dbb478ced5522_How%20Does%20Auto-Scaling%20Work.jpg?alt=media&#x26;token=b903b7bf-6f2d-421a-b164-3ad75e4e0657" alt=""><figcaption><p>Workflow</p></figcaption></figure>

### Auto-Scaling Group

An Auto Scaling group contains a collection of EC2 instances that are treated as a logical grouping for the purposes of automatic scaling and management.

<figure><img src="https://921544542-files.gitbook.io/~/files/v0/b/gitbook-x-prod.appspot.com/o/spaces%2FiRQTWHUNVZ5tIxQJXclF%2Fuploads%2FmhEUBBUXCvYa4XCy6qQs%2F1_BrV4eE8FEkTbgMboO1c-PQ.jpg?alt=media&#x26;token=b1d0a8be-1d69-4406-9b29-4b5a5848cef5" alt=""><figcaption><p>ASG</p></figcaption></figure>

### Application of AS

Application Auto-Scaling is a web service for developers and system administrators who need a solution for consequently scaling their scalable resources for individual AWS services past Amazon EC2.&#x20;

It enables us to configure automatic scaling for the subsequent resources:

* Amazon ECS services
* Spot Fleet requests
* Amazon EMR clusters
* AppStream 2.0 fleets
* DynamoDB tables and global secondary indexes
* Aurora replicas
* Amazon SageMaker endpoint variants
* Custom resources provided by your applications

### Auto-Scaling Policy Types

* Target tracking scaling: Increase or decrease the present capacity of the group based on a target value for a selected metric.
* Step scaling: Increase or decrease the present capacity of the group based on a set of scaling adjustments, known as step adjustments, that change based on the size of the alarm breach.
* Simple scaling: Increase or decrease the present capacity of the group based on a single scaling adjustment.

### Launch Configuration

* Launch Configuration is an **instance configuration** template used by the Auto-Scaling group to launch Amazon EC2 instances.
* A launch configuration is similar to an EC2 configuration and **involves the selection of the Amazon Machine Image (AMI)**, the instance type, a key pair, one or more security groups, and a block device mapping.
* Launch configurations are often related to **multiple Auto-Scaling groups.**
* Launch configuration **can’t be modified** after creation.
* Basic or detailed monitoring for the instances within the Auto-Scaling group is often enabled when a launch configuration is created.
* Basic **monitoring is enabled by default** when you create the launch configuration utilizing the AWS Management Console, and detailed monitoring is permitted when you create the launch configuration using the AWS CLI or an API.

### Launch Template

* A Launch Template identical to a launch configuration, with additional features.
* Launch Template **allows multiple versions** of a template to be defined.
* With versioning, a subset of the complete set of parameters is often created and then reused to create other templates or template versions.
* Launch Template enables the selection of both Spot and On-Demand Instances or multiple instance types.
* Launch templates support EC2 Dedicated Hosts. Dedicated Hosts are physical servers with EC2 instance capacity that are dedicated to your use.
*

```
<figure><img src="https://921544542-files.gitbook.io/~/files/v0/b/gitbook-x-prod.appspot.com/o/spaces%2FiRQTWHUNVZ5tIxQJXclF%2Fuploads%2FX8ogbWRFRMfr2hlkL8u8%2F2021-04-26-16_57_59-Launch-an-instance-from-a-launch-template-Amazon-Elastic-Compute-Cloud.png?alt=media&#x26;token=5a2b35e4-b046-4548-aad7-2895c5f8f346" alt=""><figcaption><p>Launch Template</p></figcaption></figure>
```

### Create Auto-Scaling Launch Template in AWS

1. Click on the All Services.
2. Click on the **EC2(Elastic Cloud Computing).**

<figure><img src="https://921544542-files.gitbook.io/~/files/v0/b/gitbook-x-prod.appspot.com/o/spaces%2FiRQTWHUNVZ5tIxQJXclF%2Fuploads%2FLFwoLoYExdh4Du5m5lpT%2FScreenshot30001.png?alt=media&#x26;token=558bc28e-abbe-46cd-9962-2cf0ed5d31b4" alt=""><figcaption></figcaption></figure>

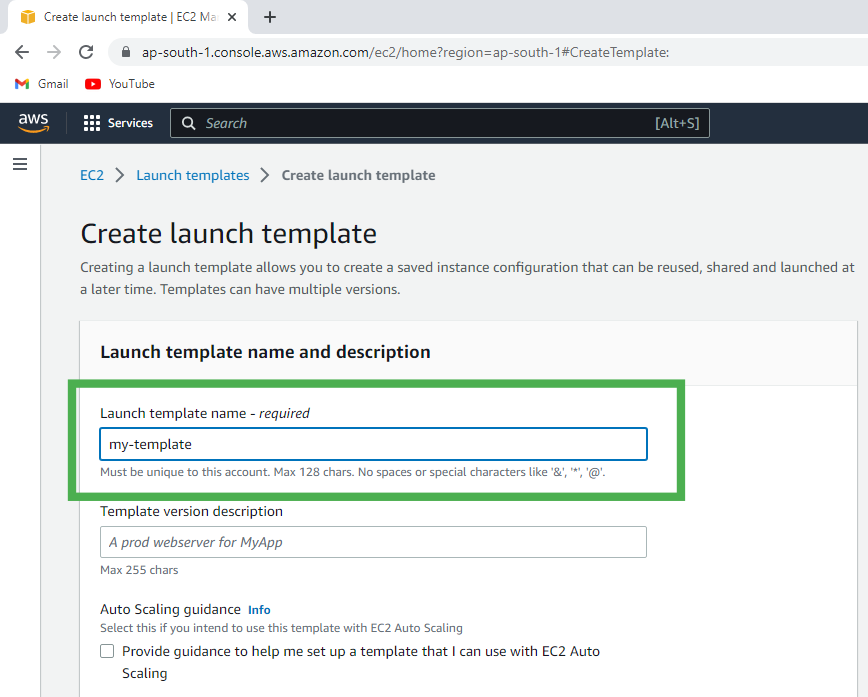
3. Scroll Down and click on the **Launch Templates** and click on the **Create launch template**

<figure><img src="https://921544542-files.gitbook.io/~/files/v0/b/gitbook-x-prod.appspot.com/o/spaces%2FiRQTWHUNVZ5tIxQJXclF%2Fuploads%2F6mFYIc73nhZBzq9qffAX%2FScreenshot30201.png?alt=media&#x26;token=69215b21-290b-434f-8c86-de96b8fb8eeb" alt=""><figcaption></figcaption></figure>

4. Type the **Template name.**

<figure><img src="https://921544542-files.gitbook.io/~/files/v0/b/gitbook-x-prod.appspot.com/o/spaces%2FiRQTWHUNVZ5tIxQJXclF%2Fuploads%2F07wV6ctFc4ODsteHFHWa%2FScreenshot30301.png?alt=media&#x26;token=791e238c-39f9-4739-b363-ae76e62ed5cc" alt=""><figcaption></figcaption></figure>

5. Select the **Amazon Machine Image.**

<figure><img src="https://921544542-files.gitbook.io/~/files/v0/b/gitbook-x-prod.appspot.com/o/spaces%2FiRQTWHUNVZ5tIxQJXclF%2Fuploads%2FhbA2WBCSDALrq3K0OiKS%2FScreenshot30401.png?alt=media&#x26;token=9a2965bb-88b2-4c81-9024-7b4580781e72" alt=""><figcaption></figcaption></figure>

6. Select the **Instance Type** and **Key pair.**

<figure><img src="https://921544542-files.gitbook.io/~/files/v0/b/gitbook-x-prod.appspot.com/o/spaces%2FiRQTWHUNVZ5tIxQJXclF%2Fuploads%2FoIGrYLWWjVDek1i5IYpi%2FScreenshot30701.png?alt=media&#x26;token=9d8c97fb-bd70-4064-88f1-35a706fe2f50" alt=""><figcaption></figcaption></figure>

7. &#x20;Select the **Security Group** or Create the new one.

<figure><img src="https://921544542-files.gitbook.io/~/files/v0/b/gitbook-x-prod.appspot.com/o/spaces%2FiRQTWHUNVZ5tIxQJXclF%2Fuploads%2FvKYfCcDJI5PKdrRggPom%2FScreenshot30801.png?alt=media&#x26;token=2f307ce2-8dd6-46f1-8a3c-abd47ab5d5bf" alt=""><figcaption></figcaption></figure>

8. Click on the **Create Launch Template.**

<figure><img src="https://921544542-files.gitbook.io/~/files/v0/b/gitbook-x-prod.appspot.com/o/spaces%2FiRQTWHUNVZ5tIxQJXclF%2Fuploads%2F5ghIcsq1qWOtTu6Yx4CZ%2FScreenshot30901.png?alt=media&#x26;token=9ba1932f-ba7f-46ed-b5b2-9175ad446f98" alt=""><figcaption></figcaption></figure>

9. Now you can see the template is **created.** Now, scroll down and click on the **Auto Scaling Groups.**

<figure><img src="https://921544542-files.gitbook.io/~/files/v0/b/gitbook-x-prod.appspot.com/o/spaces%2FiRQTWHUNVZ5tIxQJXclF%2Fuploads%2FjQKo9xZF06N3DuYY258O%2FScreenshot31301.png?alt=media&#x26;token=fd41fb5a-faa2-426b-986f-0ff093780afd" alt=""><figcaption></figcaption></figure>

### Create Auto-Scaling Group using Launch Template

1. Click on the **Create Auto Scaling group.**

<figure><img src="https://921544542-files.gitbook.io/~/files/v0/b/gitbook-x-prod.appspot.com/o/spaces%2FiRQTWHUNVZ5tIxQJXclF%2Fuploads%2FhwOifXdY25vEwbPyi0u6%2FScreenshot31501.png?alt=media&#x26;token=0fb5d658-4662-4933-bfe2-f9e8adb83018" alt=""><figcaption></figcaption></figure>

2. Type the **Auto Scaling group name.**

<figure><img src="https://921544542-files.gitbook.io/~/files/v0/b/gitbook-x-prod.appspot.com/o/spaces%2FiRQTWHUNVZ5tIxQJXclF%2Fuploads%2FZiVBGDbUPFgVBpSFTlpg%2FScreenshot31601.png?alt=media&#x26;token=02d2a381-8578-47dc-b362-f8400a9cc708" alt=""><figcaption></figcaption></figure>

3. Select your **Template.**

<figure><img src="https://921544542-files.gitbook.io/~/files/v0/b/gitbook-x-prod.appspot.com/o/spaces%2FiRQTWHUNVZ5tIxQJXclF%2Fuploads%2FwQRZInFv2M4h4SX9OGeZ%2FScreenshot31701.png?alt=media&#x26;token=dabb1046-99d5-4420-85ee-b9aa5edec630" alt=""><figcaption></figcaption></figure>

4. Select the **VPC** or go with the default VPC and also select the **Availability zone.**

<figure><img src="https://921544542-files.gitbook.io/~/files/v0/b/gitbook-x-prod.appspot.com/o/spaces%2FiRQTWHUNVZ5tIxQJXclF%2Fuploads%2FTecwETJkqNWPGw6WgYNK%2FScreenshot31901.png?alt=media&#x26;token=865f82b5-0a72-4869-b0c0-9cba74c6ed2f" alt=""><figcaption></figcaption></figure>

5. Configure the **Group size** and **Scaling policies.**

   Select as per your requirement:

   * Desired: 4
   * Minimum: 4
   * Maximum: 8

<figure><img src="https://921544542-files.gitbook.io/~/files/v0/b/gitbook-x-prod.appspot.com/o/spaces%2FiRQTWHUNVZ5tIxQJXclF%2Fuploads%2Fsku3cvkdOS0EVTSRlh5L%2FScreenshot32101.png?alt=media&#x26;token=b9f1a6eb-cbdf-49ea-8948-38e445f974a6" alt=""><figcaption></figcaption></figure>

6. Select the **Target tracking scaling policy.**

<figure><img src="https://921544542-files.gitbook.io/~/files/v0/b/gitbook-x-prod.appspot.com/o/spaces%2FiRQTWHUNVZ5tIxQJXclF%2Fuploads%2FUBljdz1pLWIYLDqPm5oF%2FScreenshot32201.png?alt=media&#x26;token=99cc22b4-70d9-426f-b74a-f7d017e47006" alt=""><figcaption></figcaption></figure>

7. Click on the **Create Auto Scaling Group.**

<figure><img src="https://921544542-files.gitbook.io/~/files/v0/b/gitbook-x-prod.appspot.com/o/spaces%2FiRQTWHUNVZ5tIxQJXclF%2Fuploads%2F2JeQxqiSDGoVuU4vDJ0R%2FScreenshot32301.png?alt=media&#x26;token=74ef561c-678b-434a-8795-2aebf11aae5b" alt=""><figcaption></figcaption></figure>

* Now you can see the **Auto Scaling is creating** and it is also creating the desired state of the EC2 Instance.

<figure><img src="https://921544542-files.gitbook.io/~/files/v0/b/gitbook-x-prod.appspot.com/o/spaces%2FiRQTWHUNVZ5tIxQJXclF%2Fuploads%2F9TbwEm4gAFVKiAe863Kr%2FScreenshot32401.png?alt=media&#x26;token=1b16e788-88a4-4fa3-9e9f-414b53bf1809" alt=""><figcaption></figcaption></figure>

* We selected the **Desired state equal to 4** and you can see the **4 Instance is Running.**

<figure><img src="https://921544542-files.gitbook.io/~/files/v0/b/gitbook-x-prod.appspot.com/o/spaces%2FiRQTWHUNVZ5tIxQJXclF%2Fuploads%2FUivPYoCBwsijSfIueAyC%2FScreenshot32501.png?alt=media&#x26;token=11e33f4f-92e1-4b91-839d-67e192caff09" alt=""><figcaption></figcaption></figure>
